Node.js server on mobile device.

Recall your first PC, and compare it to an average mobile phone. There is a good chance that the computing power of your first machine was less than the capabilities of the phone you carry in your pocket. Modern lithography allows for spectacular results in terms of the ratio of computing power to electricity consumption. As of today, perhaps the most popular mobile processor is the Qualcomm SM8350 Snapdragon 888 5G. It gives 144 GFLOPS at 1,392 pts/W while the vintage Pentium 4 650 from 2005 is only 6.02 GFLOPS at a cost-effective 13 pts/W. Not bad, right? I know that comparing extremely different solutions in terms of architecture to each other is never 100% authoritative. However, the difference between floating-point operations for old desktop processors (a few - a dozen GFLOPS) to more than 100 GFLOPS for modern mobile designs is a parameter that, in this particular application, should be a sufficient indicator. The most important parameter, however, is the power consumption of mobile devices, which is so low to the capabilities they offer that they can be successfully used as mobile application servers. It is extremely environmentally friendly and costs only a few dollars a year. Moreover, we can connect the phone to a router via a network cable (using an OTG network adapter). If our phone allows it, we can use an adapter to power it at the same time. If, in addition, we insert a sim card for Internet access, we become the owners of a server with a backup power supply (battery) and an alternative backup Internet connection!
Node, however, has several features to consider. First of all, it is asynchronous, so it does not allow us to use all the cores of our processor. When we host one application, we will not use the full potential of our processor, but only the core that was loaded with it. However, nothing prevents us from running more servers on a single device. Yes, but here it is necessary to take a feature of modern ARM processors. Their cores are not the same and differ in clocking, for example. However, these are not factors that should discourage us. The prospect of having a home server with a UPS (battery), and backup internet connection is encouraging. Below, I will outline some steps to get Node.js up and running and manage it on our phone.
Installing Termux
First of all, you need to download and install Termux. As of the date of writing this article, downloading Termux from the store is not the best option. Visit the official repository on GitHub:
(I assume that by reading this post, downloading and installing an application from outside the store is not a problem for you).
I also don’t want to rewrite all the documentation here, so I’ll limit myself to posting only the basic commands necessary to install Node.js on Termux:
apt update
apt upgrade
pkg install nodejs
Remote Access
Termux runs as an isolated environment on an Android device, which can result in some difficulties, especially when you want to access files. Most file management apps do not provide enough convenience. We, on the other hand, are interested in using Termux as a host for our applications, which suggests managing it remotely. Without remote access, we won’t be able to reload our scripts without physically interacting with the phone. We want to avoid this so we will use SSH and SFTP.
Setting up SSH and SFTP on Termux
Connecting via SSH
The first thing should be to use the command:
whoami
This is how we learn the default username.
To connect, we will also need the IP address of the host, i.e., our phone. If we don’t know it, we run in Termux the command:
ifconfig
and look for our local address in a form similar to 192.168.0.136. We save ourselves the necessary data and proceed to install OpenSSH. We run the command:
pkg install openssh
To connect to Termux, we need to install the OpenSSH client on our computer. Depending on the system, the process looks different. For Windows, go to Settings -> System -> Optional Features, search for OpenSSH client, and click install.
On Linux use command: sudo apt install openssh-client
Generating Keys and Connecting via SSH
Follow the steps below only if you have never been in contact with OpenSSH. If you already have a key pair, you can simply copy your public key to the server.
Open CMD and generate the keys:
ssh-keygen -t rsa -b 4096
Now you can decide whether you want to use a password to connect to the server. It is safer to use a password to prevent potential key theft.
See where the keys are saved, go to the location, and copy the contents of the public key to the server. Since the ssh-copy-id user@host command doesn’t work on Windows, the fastest way will be to manually copy the contents of the key to the server. You can upload it to your phone or send it via an encrypted chat app such as Messenger. Copy it to the clipboard. Then in Termux, use the command:
nano ~/.ssh/authorized_keys
and paste the contents of the key from the clipboard. Use ctrl + o to save and ctrl + x to exit Nano.
Start the SSH server by typing in Termux:
sshd
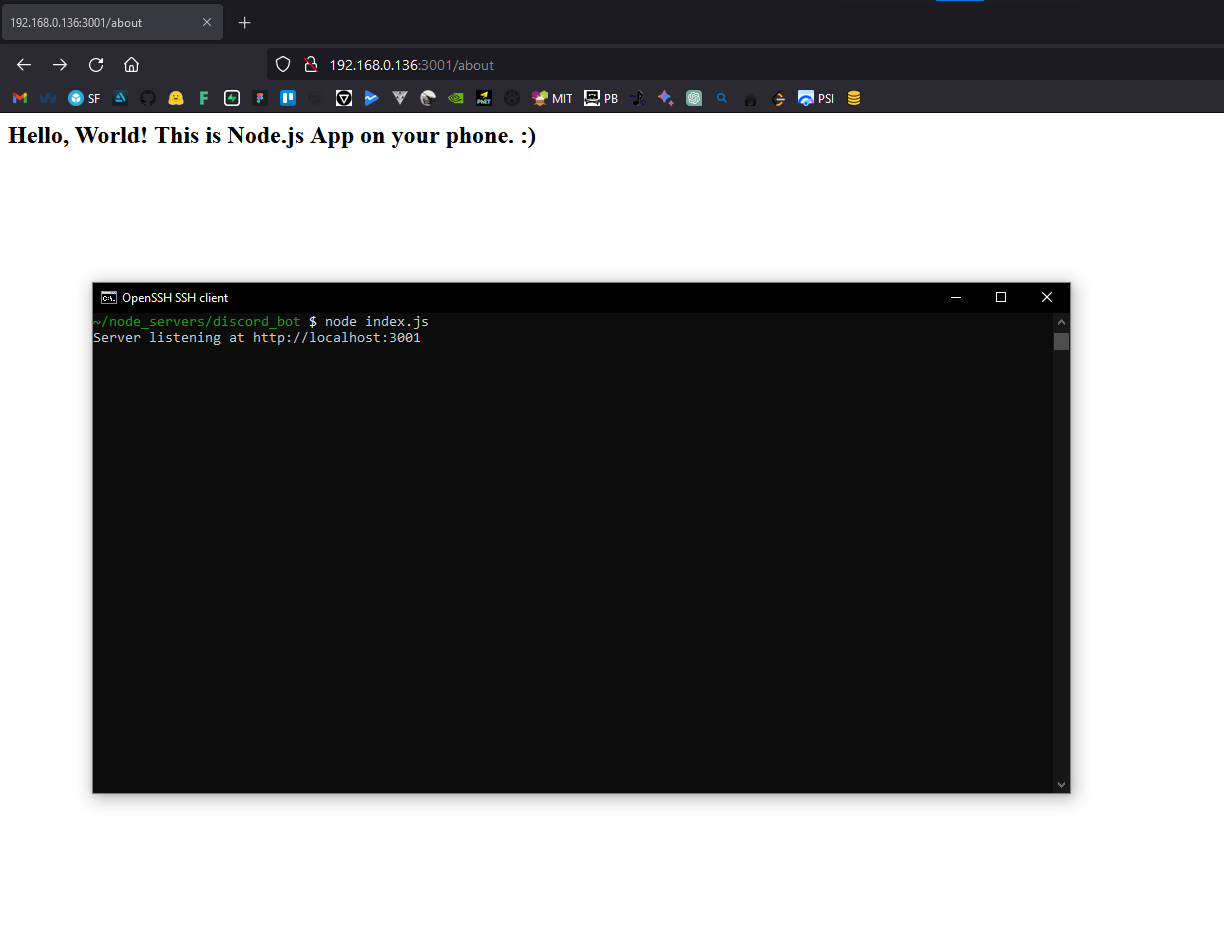
Now on your PC in the terminal, you can establish a connection to your Termux server:
ssh -p 8022 termuxusername@phoneIP
If you decide to name your file, remember to add a parameter when making the connection: -i.
ssh -p 8022 -i C:\Users\Username.ssh\keyname termuxusername@phoneIP
The -p parameter indicates the port, in this case, the default Termux SSH port which is 8022 (default SSH port is 22).
Using SFTP for File Transfer
We could end up with a terminal, but it would be nice to send files more pleasantly. First, we’ll use SFTP (the equivalent of FTP using the keys used by SSH).
To do this, we will run the command:
pkg install openssh-sftp-server
Probably, SFTP is already installed since it usually installs together with SSH.
Now let’s configure a sample client to handle SFTP, let it be FileZilla.
*Remember that Termux and SSHD must be running for the connection to be possible.
Fire up the FileZilla client and choose File -> Site Manager.
Choose the SFTP protocol from the drop-down menu.
Add our SFTP server by entering the username from Termux and the IP address of our phone.
Now we just need to make a call to the given data, and the certificate information will be displayed along with a password request. This will be the same password we created for our key file.
If we chose a different name for our key pair, we need to point FileZilla to the correct key. To do this, go to Edit -> Settings. In the window that opens, we select SFTP in the menu on the left. We add the SSH key to the list on the right. To do this, we navigate to the location with our keys. By default, it is C:\Users\Username\.ssh, and we select the Termux SSH key. Probably, FileZilla will ask us for permission to convert the key. Confirm by clicking ok.
Now we can create a target directory for our application and initialize the project with the command
npm init -y
and proceed to create the application :)
Conclusion
Congratulations, You have just become the owner of a pretty decent server, with a backup connection and an emergency power source. You can now hide your API keys and use the server, for example, to enhance the capabilities of your static pages. You can create a home automation management application based on additional microcontrollers, create a bot for Discord, or any other application that uses an external API. Good luck!